Understanding Minecraft Shaders: A Comprehensive Guide
Top 5 Minecraft Shader Packs to Enhance Your Gameplay Experience
How to Install and Configure Minecraft Shaders for Optimal Performance
Minecraft shaders can significantly enhance the visual appeal of the game, making landscapes and environments look more realistic and immersive. However, to get the best experience, you need to install and configure them properly for optimal performance. Here’s a step-by-step guide to help you through the process.
Step 1: Choose the Right Shader Pack
Before diving into installation, you need to choose a shader pack that suits your hardware capabilities. Some popular options include SEUS, Sildurs Vibrant Shaders, and Chocapic13’s shaders. Consider the compatibility with your GPU and the level of detail you desire. You can find these shader packs on websites like CurseForge or GitHub.
Step 2: Download Necessary Files
Once you’ve chosen a shader pack, download the necessary files. Most shader packs come with a main shader folder and additional texture packs. Make sure to download all the components required for the shader pack to work correctly. For instance, SEUS requires additional texture packs for optimal performance.
Step 3: Install OptiFine
OptiFine is a mod that improves Minecraft’s performance and adds numerous features, including support for shaders. If you haven’t installed it yet, head over to the OptiFine website and download the latest version compatible with your Minecraft version. Follow the installation instructions provided there. Once installed, launch Minecraft and verify that OptiFine is working correctly by checking the settings menu for new options.
Step 4: Place Shader Files in the Correct Folder
After installing OptiFine, you need to place the downloaded shader files in the right directory. Navigate to your Minecraft folder (usually located in %appdata%\.minecraft). Inside this folder, locate the shaderpacks directory. If the folder doesn’t exist, create one. Copy the shader pack files you downloaded earlier into this shaderpacks folder.
Step 5: Configure Shader Settings
Launch Minecraft and go to the video settings menu. You should see a new option labeled Shader Packs. Click on Open Shader Pack Folder to confirm that your shader pack has been installed correctly. Select your shader pack from the list and click Done.
Next, open the shader pack configuration menu by clicking on the Edit button next to your selected shader pack. Here, you can adjust various settings such as water transparency, shadows, and ambient occlusion to fine-tune the visual experience. Experiment with different settings to find the perfect balance between visuals and performance.
Step 6: Adjust Game Settings for Optimal Performance
Even with shaders installed, your system might struggle to maintain high frame rates. To optimize performance, adjust your Minecraft settings. Lowering render distance, reducing view bobbing, and turning off unnecessary graphical effects can help. Additionally, ensure that your graphics card drivers are up to date for the best performance.
Step 7: Test and Troubleshoot
After configuring your settings, start a new world or join a server to test how the shader pack performs. If you encounter issues like lag or graphical glitches, revisit your settings and try tweaking them further. Common problems can often be resolved by adjusting the shader pack’s configuration or by lowering some of your Minecraft settings.
Remember, the key to getting the most out of Minecraft shaders is finding the right balance between visual quality and performance. Experiment with different shader packs and settings until you achieve the look and feel you want without sacrificing gameplay smoothness.
Installing and configuring Minecraft shaders can transform your gaming experience, making the blocky world of Minecraft look stunningly realistic. By following these steps and optimizing your settings, you can enjoy a visually rich environment while maintaining a smooth and enjoyable gameplay experience. Happy mining!
The Impact of Minecraft Shaders on System Requirements and Performance
Minecraft shaders can significantly enhance the visual experience of the game, offering more realistic lighting, shadows, and textures. However, these enhancements come with a trade-off: increased system requirements and potential performance impacts. If you’re looking to upgrade your Minecraft experience with shaders, understanding how they affect your system’s performance is crucial.
Before diving into the specifics, let’s define what shaders are. Shaders are small programs that run on your GPU (graphics processing unit) to process graphical data. They can alter how light behaves, how textures are applied, and even how water looks. While vanilla Minecraft uses basic shaders provided by Mojang, custom shaders like OptiFine or Sodium offer more advanced effects.
To gauge the impact of shaders on your system, consider the following:
- Graphics Card: The most critical component. High-end GPUs like NVIDIA GeForce RTX series or AMD Radeon RX 5000 series are better equipped to handle complex shaders.
- CPU: A powerful CPU helps in managing the additional load, especially when shaders require complex calculations.
- RAM: More RAM ensures smoother gameplay, particularly when running resource-heavy mods alongside shaders.
The performance hit from shaders can vary widely depending on the complexity of the shader pack. For instance, the SEUS (Sonic Ether Unbelievable Shader) is known for its high visual fidelity but demands a robust system. On the other hand, simpler shader packs like Chocapic13 Shaders offer a balance between visual quality and performance.
Optimizing Your System for Shaders
To get the best out of shaders without compromising too much on performance, consider the following optimizations:
- Reduce View Distance: Lowering the view distance in Minecraft settings can help alleviate some strain on your GPU and CPU.
- Lower Render Distance: Similar to view distance, reducing render distance can also improve performance.
- Adjust Graphics Settings: Lowering the graphics settings within the shader pack itself can help manage the load. Look for options to reduce shadow resolution, anti-aliasing, and other visual enhancements.
- Update Drivers: Keeping your GPU drivers updated ensures that your hardware is running efficiently and can handle the latest shader features.
Choosing the Right Shader Pack
Selecting the right shader pack is key to balancing visual quality and performance. Here are some popular shader packs categorized by their complexity:
- Lightweight: Immersive Shaders, Sonorous Shaders
- Moderate: SEUS, Chocapic13 Shaders
- Heavy: TF Shaders, Redalclown Shaders
Each shader pack has its own set of features and requirements. Lightweight shaders are ideal for players with less powerful systems, while heavy shaders are best suited for high-end setups.
Testing Before Commitment
Before committing to a shader pack, test it on your system. Many shader packs offer demo versions or can be configured to run in a lightweight mode initially. This allows you to assess the performance impact without fully installing the pack.
For example, you can start with a low-resolution texture pack and gradually increase the settings to see how your system handles it. Tools like NVIDIA’s PC Performance Guide or AMD OverDrive can help you monitor your system’s performance during testing.
Remember, the key is to find a balance that offers the visual quality you desire without overwhelming your system. With the right shader pack and some optimization tweaks, you can enjoy a visually stunning Minecraft world that runs smoothly on your setup.
Creative Uses of Shaders in Minecraft to Achieve Stunning Visual Effects
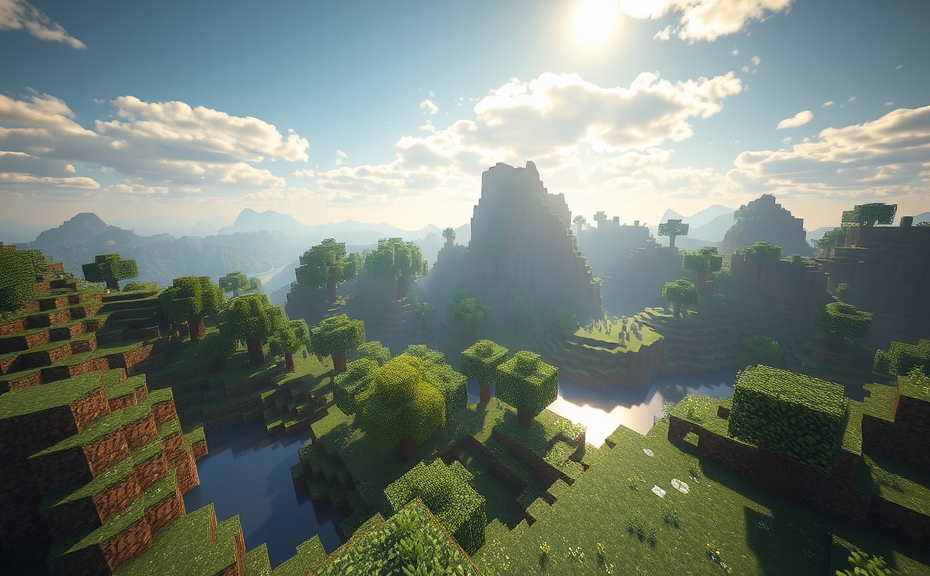
Minecraft has always been celebrated for its blocky, pixelated aesthetic, but with the advent of shaders, players can transform their gaming experience into a visually stunning adventure. Shaders in Minecraft are essentially modifications (mods) that enhance the game’s graphical capabilities, providing more realistic lighting, shadows, water effects, and much more. By incorporating shaders, you can create a more immersive and breathtaking environment within the blocky world of Minecraft.
One of the most popular uses of shaders is to achieve a more lifelike water effect. Traditional Minecraft water looks like a flat, blue plane, but with shaders, it becomes transparent, reflecting the surroundings and casting realistic shadows. To achieve this, you need to install a shader pack, such as SEUS or OptiFine, which are designed to work seamlessly with the latest versions of Minecraft. These shader packs offer a variety of settings to tweak, allowing you to customize the appearance of water to your liking.
Another creative way to use shaders is to simulate dynamic weather conditions. With shaders, you can add realistic raindrops that fall on the ground and create puddles, enhancing the realism of rainy days in Minecraft. You can also adjust the intensity and duration of these effects, making the weather feel more alive and unpredictable. This adds a new layer of immersion, especially when combined with other shader effects like lightning strikes that illuminate the landscape.
Lighting and shadows play a crucial role in enhancing the visual appeal of Minecraft. Shaders allow you to introduce soft shadows and ambient occlusion, which give objects depth and realism. For instance, placing a torch near a wall will cast soft, realistic shadows, making the scene look more natural. Similarly, shadows under trees and other structures become more pronounced, adding a sense of dimensionality to the world. This not only improves the overall aesthetic but also helps in navigation, as darker areas can now be easily distinguished from lighter ones.
One of the most striking uses of shaders is to create a night-time atmosphere. With traditional Minecraft, nighttime is often too dark and difficult to navigate. However, shaders can introduce moonlight, starlight, and even auroras, making the night sky vibrant and full of life. The moon can cast a gentle glow over the landscape, while stars twinkle in the sky, and auroras dance across the horizon. This not only enhances the visual experience but also makes nighttime gameplay more enjoyable and less frustrating.
Shaders also enable the creation of more detailed and realistic terrain. For example, you can use shaders to add snow accumulation on mountains and trees, making the landscape appear more diverse and dynamic. Snow can accumulate naturally, melting over time or being disturbed by players and mobs. Additionally, shaders can simulate grass growth, leaves changing colors with the seasons, and even the formation of ice on lakes and rivers. These small details add a layer of realism that makes the world feel alive and ever-changing.
To fully leverage the potential of shaders, it’s important to understand how to optimize your Minecraft installation. Shaders can be resource-intensive, so having a powerful computer is recommended. Mods like OptiFine can help improve performance by optimizing textures and reducing lag. Additionally, adjusting the settings within the shader pack can balance visual quality with performance, ensuring a smooth and enjoyable experience.
Shaders in Minecraft open up a world of possibilities for enhancing the visual experience. From realistic water effects and dynamic weather to enhanced lighting and detailed terrain, shaders can transform the simple blocky world into a breathtakingly beautiful environment. Whether you’re looking to immerse yourself in a more realistic adventure or simply enjoy a more visually appealing game, shaders offer endless opportunities to customize and beautify your Minecraft world.
Remember, the key to a successful shader experience is experimentation. Try different shader packs and settings to find what works best for your system and preferences. With a little creativity and tweaking, you can create a Minecraft world that is not only fun to play in but also a feast for the eyes.
Key Takeaways:
- Shaders can significantly enhance the visual appeal of Minecraft, making it more realistic and immersive.
- Popular shader packs include SEUS and OptiFine, offering various settings to customize the visual experience.
- Dynamic water effects, realistic shadows, and enhanced lighting can be achieved with shaders.
- Optimize your Minecraft installation with mods like OptiFine to ensure smooth performance.
- Experiment with different shader packs and settings to find the perfect balance between visual quality and performance.
Conclusion
Minecraft shaders can truly transform your gaming experience, making blocky landscapes come alive with vibrant colors and realistic textures. By understanding how shaders work and choosing the right pack for your system, you can unlock stunning visual effects that were once unimaginable in the blocky world of Minecraft. Whether you’re looking to enhance the beauty of your builds or simply enjoy a more immersive gameplay environment, shaders offer endless possibilities. Remember to adjust settings carefully to ensure smooth performance, and don’t hesitate to experiment with different configurations to find what works best for you. With the right approach, shaders can elevate your Minecraft world, turning it into a visually captivating realm that feels almost lifelike. Embrace the power of shaders, and let your creativity shine through in ways you never thought possible.